

EndothermeTM 1470nm: Treatment protocol
Before deciding to undertake an endoluminal treatment, the physician performs a Doppler ultrasound examination of the deep and superficial venous system, including a venous cartography.
The physician informs the patient of available treatment options, including the advantages and drawbacks of each.
A written information leaflet is provided to the patient, describing the endoluminal techniques, the postoperative outcomes, the potential complications, the alternative options, the benefits and risks of the proposed treatment.
A formal cost estimate is provided to the patient.
A reflection period of at least 15 days is required before treatment, except in therapeutic emergency situations (e.g. in case of leg ulcer)
1) Marking of the superficial venous system
Prior to the procedure, a Doppler ultrasound examination is performed allowing a pre-marking and tracking of the superficial venous system.
This operation consists in tracing the route of the saphenous vein, tributaries and perforating veins. Vein calibers in orthostatic position are measured at the junction, mid-thigh and puncture point.
2) Patient preparation
The patient is placed in a dorsal supine position for the great saphenous vein and in a ventral supine position for the small saphenous vein.
The lower limb is completely brushed with a Biseptine or Betadine dermal solution before the sterile field is set up. Adhesive surgical drapes (e.g. Steridrape®) or sterile jersey socks are used to protect the soiled areas or ulcers.
The protective cover is installed on the ultrasound probe.
The ultrasound system displays then transverse and afterward longitudinal views of the vein.
3) Selection of the fiber
| Standard fiber | Slim fiber |
|---|---|
|
|
4) Puncture and sheath
The saphenous vein is catheterized, preferably through ultrasound-guided direct puncture, legs down, with an 18 G puncture needle or a 16 G cathlon.
If an introducer is used, the hydrophilic or silicone guidewire is inserted into the vein lumen. The dilator/introducer sheath is placed over the guidewire. The dilator and the guidewire are then removed.
5) Insertion of the fiber
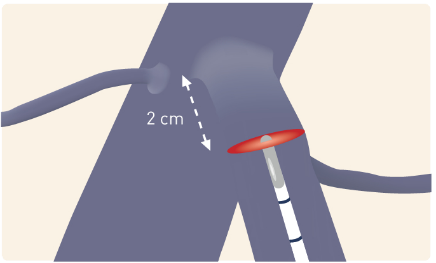
Once connected to the laser device and aiming beam checked, the fiber is introduced into the vein to be positioned at safe distance, more than 1 cm from the junction (SF or SP depending on the position), under ultrasound monitoring.
6) Tumescent anesthesia
Tumescent anesthesia is essential for the protection of surrounding tissues and prevents from potential paresthesia. The patient is placed in Trendelenburg position to ensure optimal blood evacuation from the vein and to improve tumescence action. It is advisable to use an injection pump to perform the tumescent anesthesia with a solution of tumescence which composition is according to with the recommendations in force.
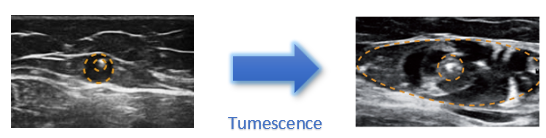
Tumescent anesthesia is instilled into the saphenous compartment along the saphenous vein, under ultrasound guidance, from distal to proximal. An approximate solution dosage of 70 mL is injected into the saphenous compartment at 10 cm intervals. The solution has to isolate the saphenous vein at a safe distance (≥ 10 mm from the skin or the nerves). Significant tumescence is required for a small saphenous vein. Usually, the tumescence occurring around the vein should reduce the initial diameter of the vein by a factor of about 2.
7) Laser Settings and startup
The fluency required for the occlusion of the saphenous vein ranges between 60 and 90 J/cm, depending on its diameter. The tables below permit the laser setting depending on the diameter of the vein to be treated.
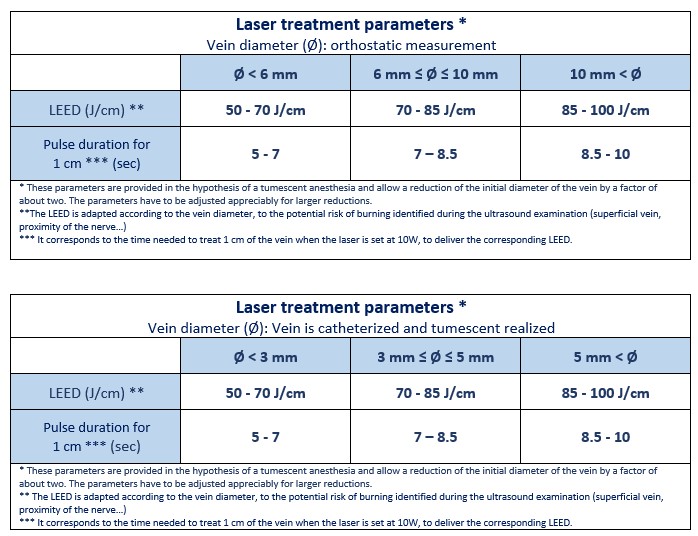
These parameters are provided for information purposes and have to be adjusted to each physician’s practice and to the implementation of the procedure.
Warning: With the Slim fiber, the maximum LEED to use is: 80 J/cm.
Reminder: Before laser emission, the position of fiber tip at the proximal part of the venous segment to be treated must be checked. This point must be at least:
- 1 cm from the sapheno-femoral junction, under the last tributary vein (the reference point is the superficial epigastric vein that must remain permeable) in the case of a great saphenous vein
- 1 cm from the popliteal crease in the case of a small saphenous vein.
Do not forget to wear safety goggles. They are required for each person in the operating room, including the patient.
Tissue transillumination (do not forget to set the aiming beam on “high”) allows an assessment of the distance separating the vein from the dermis, and confirms that the fiber protrudes from the catheter. Observing this transillumination is a control ensuring the safety of the procedure and must be performed throughout the duration of laser emission.
8) Treatment – laser shoot and fiber withdrawal
Thermal energy is delivered into the vein under the laser pulse action during the progressive withdrawal of the fiber that must be performed with caution in the last centimeters, due to the risk caused by the laser beam at fiber output and to potential burns that may affect hypodermis.
The withdrawal, manual or assisted, depending on the model of the laser device used, is done according to the defined settings and the tables above (also see the “Start-up and configuration” of the laser device used).
Laser emission may be triggered in a continuous or discontinuous mode.
In discontinuous mode, fiber pullback and laser shot are alternatively operated. Recommendation is to apply a 3mm distance between each laser shot.
In continuous mode, laser shot and fiber pullback are simultaneously operated. The pullback speed is adjusted by synchronization of the sound signals (emitted by the device) and the pullout of fiber marking (one cm per signal). For additional information, refer to operator’s manual issued for this laser device.
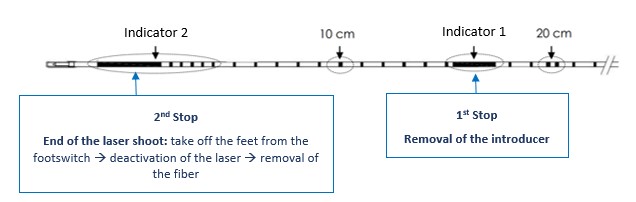
The fiber is marked every centimeter.
Two specific marks announce two important steps: removal of the introducer and stopping of the laser shoot.
9) Post-treatment control
At the end of the procedure, it is possible, under ultrasound monitoring, to validate a reduction in the vein diameter or a vein occlusion, without reflux, confirming the effectiveness of laser shoot.
10) After the procedure
An elastic bandage / elastic adhesive bandage or a class 2 compression stocking is put on the leg up to the tight for the treatment of the small saphenous vein, and up to the inguinal region for the treatment of the great saphenous vein, in order to prevent the risk of thrombosis and to minimize inflammatory symptoms.
The patient leaves the treatment facility immediately after the procedure or one to two hours after surgery, with the telephone number of the physician who is available to assist the patient 24 hours a day. Walking is recommended on the same day as the procedure and the days after.
An anticoagulant therapy with HBPM or Fondaparinux on prophylactic doses can be prescribed for seven days, according to patient needs.
Analgesic or anti-inflammatory treatment is not prescribed systematically but is adapted according to the severity of inflammation which is not systematic and occurs more often five days after surgery.
An operative report is provided to treating and prescribing physicians, and to the patient.
Undertaking a long-haul air travel is not recommended during the three weeks following the procedure, date on which sporting activities may be resumed.